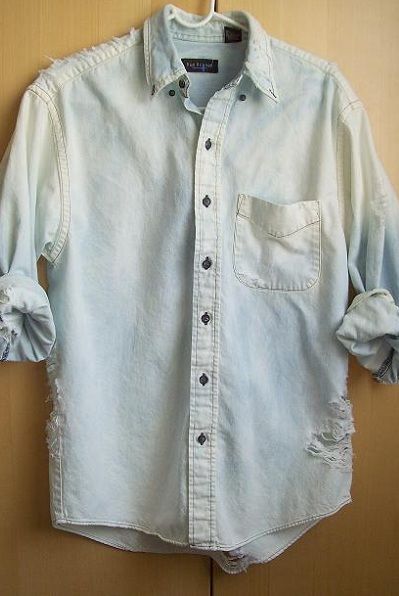
I love a good DIY and after seeing Rihanna (completely smitten with her style lately) rock a distressed denim shirt I knew I wanted in.
I’ve distressed quite a few pairs of jeans and knew the process pretty well but finding the right jacket with the perfect fit was the problem.
Also, who wants to pay retail for an item they are going to deconstruct? Thank heavens for thrift stores and after endlessly searching the infinite racks I found the perfect, oversized men’s denim shirt (size 14 1/2…whats the odds of finding that size). So I would suggest starting there first and once you have found the shirt, run back here and follow these steps.
GRAB THESE:
-Denim Shirt
-Bleach
-Sanding Sponge or sandpaper
DO THIS:
****Caution: This DIY would be best in a well ventilated area. From the cotton remnants to the bleach, there are a couple of potentially hazardous situations so if mother nature won’t provide you with a perfect sunny day please make sure the windows are open and a vacuum cleaner is near by****
–First figure out where you want the distressed areas to be. I went with a more “organic” approach and jumped into the sanding head first.
–With a general idea of what you want the shirt to look like, get a comfy, grab a flat surface and lay the shirt out. If you are a wild sander please do not do this on a kitchen table or end table beloved by any member in your household. No family heirlooms or unfinished wood…FYI, BAD IDEA.
–In the past I’ve always used regular sanding paper. However after being introduced to the sanding sponge which looks like something used during a manicure I can’t say I will ever go back. It was so much easier and the finer granules really loosened the denim fibers without completely destroying them. So with that said let the sanding begin.
–Working in small sections, begin sanding the area until you begin to see the underlying cross fibers. These are the ones you want to keep so try hard no to destroy them. Some will break which is fine but try to keep most of them together.
–Once they are visible begin to separate them by hand. Gently tug on the section to further loosen the strand and create the typical distressed look.
–Done sanding? Then its bleaching time
–There are so many designs you can create with bleach and denim so again this step is completely open to variations. I wanted a washed out look so, after filling the bathroom sink with a bit of water (not even 1/4 full) I crumpled up the shirt, put it in the sink and slowly began pouring the bleach directly on it. I let it sit as is just until I saw the change begin and then I began soaking the whole shirt in bleach, completely saturating it.
–I let it sit for about 1-2 minutes then returned to see how light the denim was. It wasn’t completely to where I wanted it but close enough so I drained the sink and rinsed the shirt with cold water. This is extremely important. You will want to rinse early, even if it isn’t light enough. Somehow I’ve noticed that through the rinsing and eventual rewashing and drying the denim will get lighter. Plus you want to rinse out the bleach really well because it will still effect the denim as it dries.
–After rinsing it out in the sink I put it through a quick wash without soap and then dried it. Its probably best that as your shirt is drying you take some time to vacuum or sweep (depending where you started) the remnants of the old piece. All the sanded away denim, if it made it to the floor and not your nostrils..lol, is probably coating your floor right now.
Now all that’s left is wearing it out. Enjoy!!


28 Comments
Nice! i would defs wear the second one, not the first
i cant say i like this effect..
Woah woah woah.. that looks good enough to sell.. :O
great DIY
COOL
Great
wow
love it
Not for me but a fabulous idea for those who want a distressed look at an affordable price.
i might try this out.
Loveeee it
interesting!!
great idea
I would rather not have holes in my clothes.
LOVE IT
..interesting!..thanks 😎
Not really keen on the overall effect but some learned some techniques!
wow that looks pretty awesome!
awesome
Love the back/shoulder area you made!
great idea
looks good
i think with all the effort i would rather just buy something like it lol i’m lazy
this is great idea.
Lol! That’s one way to destroy a good shirt!
love the DIY
I cannot WAIT to try this! I don’t have a spare denim shirt though…do you think it would work with just a blue guy’s collared shirt?
Like the effect, but it’s not something I would personally wear